1-Specify the Samba Server
lets give my example server with IP 192.168.58.142 2- Install Samba
open terminal and install samba package and dependencies
откроем терминал и установим пакеты Samba и зависимоти
$sudo apt-get install libcupsys2 samba samba-common
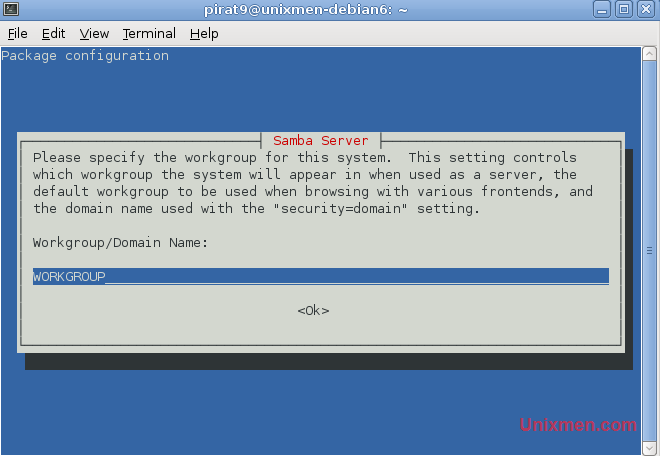
You will see the following questions: Вы увидете вопрос:
Workgroup/Domain Name: <-- WORKGROUP
Enter a workgroup name Введите имя рабочей группы
Edit the smb.conf file using the command: Отредактируйте файл smb.conf используя коману
vi /etc/samba/smb.conf
Раскомментируйте строку security = user ******** Параметр smb.conf, устанавливающий режим безопасности уровня пользователя: security = user
Это значение устанавливается по умолчанию в Samba, начиная с версий 2.2.x.
********
[...]
# "security = user" is always a good idea. This will require a Unix account
# in this server for every user accessing the server. See
# /usr/share/doc/samba-doc/htmldocs/Samba3-HOWTO/ServerType.html
# in the samba-doc package for details.
security = user
[...]
This enables Linux system users to log in to the Samba server.
сохраните файл и перезагрузите Samb'у
/etc/init.d/samba restart
3- Add the Samba Shares
This will add a share that will be accessible from all users. Теперь добавим общею папку для всех пользователей Создайте каталок для общих документов измените группу на users
Create the directory for sharing the files and change the group to the users group:
mkdir -p /home/samba-share/allusers
chown -R root:users /home/samba-share/allusers/
chmod -R ug+rwx,o+rx-w /home/samba-share/allusers/
At the end of the file /etc/samba/smb.conf add the following lines: добавте в конец файла smb.conf строки
First open the smb.conf file using the command: откройте smb.conf командой
vi /etc/samba/smb.conf
and add: и добавте
[allusers]
comment = All Users
path = /home/samba-share/allusers
valid users = @users
force group = users
create mask = 0660
directory mask = 0771
writable = yes
If you want all users to be able to read
and write to their home directories via Samba, add the following lines
to /etc/samba/smb.conf:
если вы хотите дать возможность пользователям читать и записывать в директорию то добавте следующие строки в smb.conf
[...]
[homes]
comment = Home Directories
browseable = no
valid users = @users
writable = yes
create mask = 0700
directory mask = 0700
save and restart Samba: сохраните и перезагрузите Samba
/etc/init.d/samba restart
Dont forget to set read only to noin the config file
# By default, the home directories are exported read-only. Change the
# next parameter to 'no' if you want to be able to write to them.
 read only = no
4 Add and manage the Users
In this example, I will add a user named
tom. You can add as many users as you need in the same way, just
replace the username tom with the desired username in the commands. В этом примере я добавил пользователя с именем tom. Вы можете добавить столько пользователей сколько вам нужно, замените имя пользователя tom на то которое вам нужно
useradd samba-user -m -G users
Set a password for samba-user in the Linux system .
-> Enter the password for the new user. создадим пароль для нового пользователя
root@unixmen-debian6:~# passwd samba-user
Output
Enter new UNIX password:
Retype new UNIX password:
Now add the user to the Samba user database: Теперь добавим пользователя в базу данных Samba
root@unixmen-debian6:~# smbpasswd -a samba-user
Output
New SMB password:
Retype new SMB password:
Added user samba-user.
root@unixmen-debian6:~#

Now you should be able to log in from your Windows workstation with the
file explorer (address is \\192.168.58.142  or
\\192.168.58.142\samba-user  for samba-user  home directory)
login to the samba server
Источник: http://www.unixmen.com/linux-tutorials/1524-standalone-samba-in-debian-squeeze | 